Resurrecting an iPod Mini From the Dead
 A friend at work asked me if I could resurrect an iPod Mini that booted to the dreaded "Sad iPod Icon." Told her I'd give it a shot, thinking one of the "5 R's" would bring it back to life. My wife has always managed to cure her own iPods, so I knew there was a source of advice available on what things can be tried to get it working again. Although she has a whole family of various iPod models, none of them is a Mini. Little did I know at the outset that it would be a little more work than fiddling with some button combinations on the click wheel to reset it and restore the operating software, if necessary.
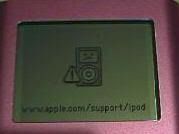 I got my first clue of this when the iPod Mini was delivered to me by my friend. She told me they had already been through Apple's "5 R's" several times without avail. Not a good sign. Nevertheless, I took it home and went through them a couple times myself, including trying to put the iPod into mass storage drive mode. Same results as she had. Nothing more could be prodded out of it beyond the "Sad iPod" screen. OK, off to the computer and the search engine of search engines: Google. What I didn't know before getting pages of hits about the iPod Mini and the "Sad iPod" icon was soon revealed.
The Bad News:
The meaning of a "Sad iPod" icon on a Mini:
[with apologies to Monty Python]
The Good News:
Powering up with an Apple icon and displaying the "Sad iPod" icon almost always means the logic board (main circuit board) and display are OK. Very, very likely the click wheel and daughter board with earbud jack are OK too. More Good News: the iPod Mini can be disassembled and the original Seagate ST-1 MicroDrive replaced with a CompactFlash card.
Better News:
While it's cracked open for major thoracic surgery, might as well replace the battery too.
 Age and repeated recharging has likely reduced its capacity (translates into playing time). The original battery Apple used was rated at 400 mAh capacity. Target offers 400 mAh replacements for $40. Surprisingly high priced as on-line (easily found) sellers of iPod parts offer 650 mAh significantly higher capacity (~1.5X) drop-in replacements for 2/5ths of Target's price, including shipping cost. Better yet, CompactFlash also uses less power than a MicroDrive. An iPod Mini with both CompactFlash and new 650 mAh battery won't run just 1.5X longer between recharges, it will run even longer, likely 2X or more.
The Best News:
At the time the iPod Mini was originally designed and made, MicroDrives were expensive. That's why Apple only used 2GB and 4GB drives.
Now to get the iPod apart and extract its MicroDrive. I just happen to have memory card readers on two desktop machines that have a slot for MicroDrive/CompactFlash memory cards.
[with apologies to Frank Baum]
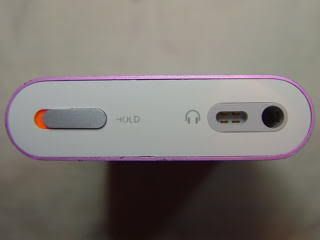 Examining the outside, the mechanical design concept for its case is obvious. It is an extruded aluminum shell with plastic top and bottom caps, with two holes in the front for the display window and click wheel switch pad. What isn't obvious is how the plastic top and bottom caps are attached. There are no fasteners (screws, nuts, rivets, etc.) visible and there are no labels or bezels that could be concealing fasteners. That means the top and bottom plastic caps must either snap on or be held in place with an adhesive or glue. Turns out, after a little more Google work, that they're held in place on metal plates just under them with adhesive. However, they're thin and can be easily broken if removal is attempted too aggressively. Past experience has taught me that getting an adhesive to "release" requires just enough tension applied and patience to allow it to slowly give way.
 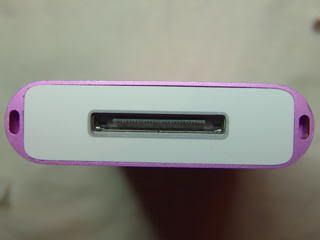 The bottom plastic cover is more fragile than the top too, with its wide rectangular hole for the docking connector and thin strips of plastic above and below the hole.
A small and extremely thin knife blade edge can be slipped between the aluminum shell and the plastic top and bottom caps. The trick is not going too deep and damaging any components immediately under the cap, or break the guide pegs on the underside of the caps around their edges (aids installation of them during assembly and adds a little strength when completely assembled). Some gentle sideways prying, just under the cap edge (not on anything under it) and alternately working both the front and back long edges eventually releases the adhesive. Some folks suggest using a hair dryer to heat the caps (and the adhesive) to help it release. Yes, it could help as hot adhesive usually doesn't hold as well, but controlling the amount of heat and where it's directed is difficult. Even if the hair dryer is on its "low" setting it could warp the plastic, and too much heat on the click wheel could damage it too. I avoid using any form of hot air "heat gun" if at all possible. Room temperature and patience was all that was required to get this iPod's caps off.
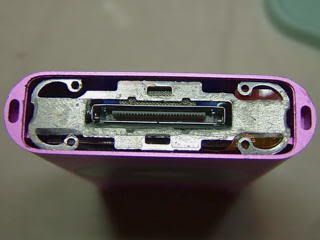 Sure enough, under the caps are metal plates. The bottom one clips into four grooves at each end of the iPod's front and back. The curved arms that clip into the grooves, and the holes in the ends of them are there to aid in installing and removing it. This photo was done during reassembly. The adhesive that holds the bottom cap to the plate can be seen clearly. I added a little more adhesive of the same type to help hold the cap on securely as the plate and cap had been handled some while they were off.
An extremely small pair of needle nose pliers, taking great care not to insert the nose tips too far into the holes allowed squeezing the clip arms and removing each side. What's found under this metal plate shows why care must be taken to not insert the blade used to pry the plastic cap off or the tool is used to unclip the metal plate under it too far into the ipod.
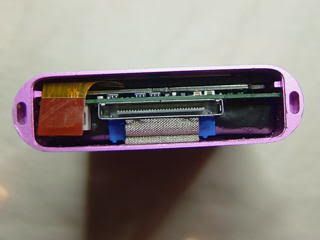 The very thin mylar cable with copper flex traces embedded in it that connects the click wheel to the logic board is just under one end of this clip. The "button" connector on the end of the cable has a mating connector on the edge of the logic board. These types of cables are easily damaged! Go too far with a tool under the cap or plate and the cable or its connector will get damaged. A damaged the click wheel cable or connector cannot be repaired; it requires removing and replacing the entire click wheel assembly with a new one. The cable in this photo has already been disconnected from its mate on the logic board by very gently prying alternately on each side of the connector until it came loose. It's a snap fit, so it should be obvious when it finally pops out. Do not pull on the cable or exert too much force on the tab on the end if it!
 Under the top cap is another metal plate. Turns out this one is attached to a daughter board with the audio ear bud jack and "Hold" switch on it. The daughter board is, in turn, attached to the main logic board. There are two #000 size Phillips screws that attach this plate to the top end of the iPod and hold the entire logic board assembly inside the case. As with the bottom plate, the adhesive used to hold the plastic top cap on can be seen in the photo. Removal of the logic board assembly from inside the aluminum case requires removing these two screws using a jewelers driver. Ensure it's a #000 Phillips or cross-tip, one of the smallest made, as anything bigger will not fit into the heads properly and strip out the slots. The screws have non-permanent thread locking adhesive on them and they're driven in firmly when the iPod is assembled in Apple's factory. This requires firm pressure on the screwdriver pushing it into the screw head while carefully turning it. The driver can start to back out of the screw head (in spite of some pressure on it) which necessitates stopping as soon as it does so, reseating it, and trying to turn it again. The thread locking adhesive will eventually "give" and the screws will come out, but it's very important not to damage the screw heads while removing them! They are all that hold the entire electronics assembly inside the case. It also helps to work over a towel or old T-Shirt, well away from the table or bench edges, to keep from losing them when they come out. I suppose replacement screws can be had, but have never seen anything suitable as tiny as these are. They can't be replaced by a simple trip to the local hardware store! I also use a very small Tupperware container with seal (aka lid) to keep parts like this in, so they don't get lost.
Felis Catus Interruptus:
 Do you ever get that feeling someone might be watching? Ever try to do fine, detailed work requiring a steady hand with someone supervising it by watching closely over your shoulder? Just as I was about to remove the two #000 Phillips screws from the top plate, I sensed being closely watched. Suddenly I was being closely supervised, by our cat, Frisky, who jumped up on my shoulder and perched there, watching everything going on. She does when she wants attention, sometimes several times in a singe evening. What she really wants is a free ride around the house perched on my shoulders, trilling in my ear and rubbing her head against mine the entire time. At least she did it before I had the Phillips driver firmly engaged in the screw head. Picture was done with my cell phone held out at arm's length. After I deposited my "supervisor" onto a high perch (she climbs from my shoulder onto it), I got back to work on the iPod.
 Once the screws are out, and after double-checking to ensure the click wheel cable is disconnected, the entire logic board assembly can be carefully slid out through the top by firmly pushing on the bottom docking connector. Do not pull on the top plate as this can break the daughter board off of the main logic board, and slide it out slowly. My fingers aren't that huge, but they still didn't fit far enough into the bottom of the case to push the board all the way out. My little finger was almost narrow enough. Used the eraser end of a common wooden pencil to push it the rest of the way out. The cap end of a narrow plastic pen can also be used. Push on the docking connector, not on the board or click wheel connector. The photo shows all the parts: top and bottom plastic caps, the metal plate from the bottom, and the Phillips screws from the top. All the parts except the logic board went into the Tupperware bin, sealed up and set aside until they were needed for reassembling it.
 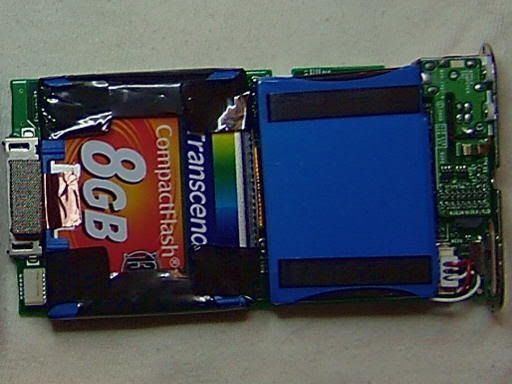 Flipping the logic board over shows the drive and battery. This photo was done with the new CompactFlash drive installed, but the old battery still in place. The battery is opposite the display at the top and the drive opposite the click wheel at the bottom. The dull silver rectangle in a metal frame is actually a piece of stiff foam inside a fine wire mesh tube. It grounds the body of the drive to the logic board's ground plane and aluminum iPod case. The drive is given shock protection by wrapping its edges in a neoprene U-channel held in place with tape, along with the header connector for the drive that has a very short ribbon cable running to a tiny board connector (hidden by the battery). The small piece of copper conductive tape also wraps around the blue neoprene channel to provide a conductive path from the metal plate on the drive to the grounded wire mesh. The battery is attached with a very small square foam adhesive pad to the top of a small integrated circuit chip on the board.
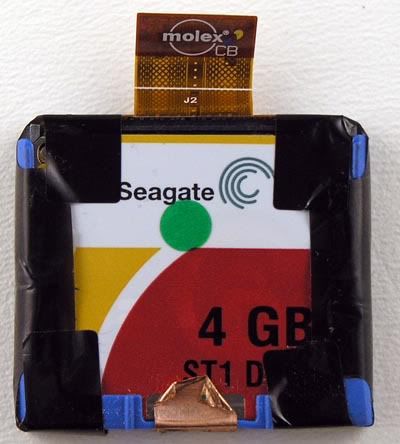 The battery must be at least pulled up and away from the board as most of the drive interconnect cable and its connection to the logic board are under the battery. The battery is held in place, primarily to keep it from shifting around inside the iPod with a very small square of thin adhesive foam pad. After the drive has been disconnected from the logic board, the tape, shock absorbing frame and interconnecting ribbon cable must be removed.
 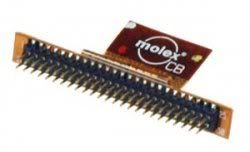 The short interconnect cable was made by Molex, a major name brand of industrial, commercial and military electrical and electronics connectors. The double row of header pins mate with a matching double row of header holes on the top edge of the drive. The double row of pins can be seen inside the MicroDrive/CompactFlash slot of a memory card reader. Once I had everything removed from the MicroDrive, it could be tested in the MD/CF slot of the memory card reader in my desktop computer.
Slid the drive into the MD/CF slot in the memory card reader, and the card reader's LED lit up (meaning a memory card has been inserted into one of its four slots). Not loud enough to be heard while inside the iPod, a soft grinding sound lasting about two or three seconds was emitted by the MicroDrive after it was inserted into the memory card reader. This kept repeating continuously until I pulled the drive out of the card reader.
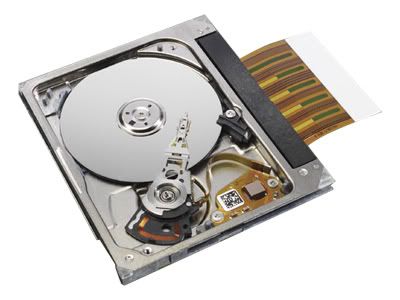 The computer's O/S also did not acknowledge the presence of a removable drive. Even if it were completely unformatted, the O/S (Windows XP) should at least come up with a dialog box offering to format the drive. I have more than one desktop machine, and all of them have memory card readers. So, it was inserted into the MD/CF slot in a second destop computer which resulted in exactly the same behavior as when it was in the first one. The picture shows what the inside of a Seagate ST1 looks like. Most likely the repeating grinding sound was the read head arm trying to deploy or move to read the drive platter.
[more apologies to Frank Baum]
With the new drive and battery installed, reassembly is simply the reverse of disassembly. I added some thin adhesive strips to the top and bottom plates to rejuvinate what was there as handling them, along with the plastic end caps had likely degraded the original adhesive some. It's a very similar, non-permanent adhesive, which means the caps can still be removed at some point in the future if necessary.
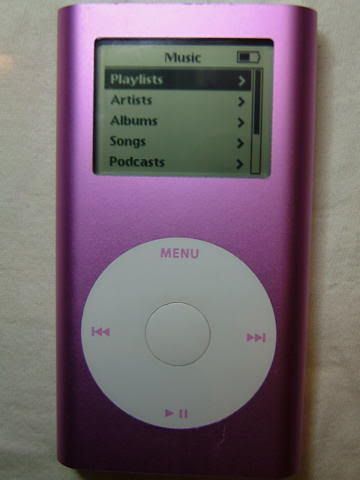 After the iPod was completely reassembled, it was time for the infamous "Smoke Test." Contrary to popular belief, promoted by electrical engineers world-wide, electronics do not run on electricity or electrons. It's one of the greatest hoaxes ever foisted upon mankind. They run on pressurized smoke. Ever see an electron? I daresay everyone has seen smoke though. The proof of this is seeing the smoke leak out when electronic devices fail. Disengaged the "Hold" switch on top and depressed the center click wheel button. The iPod sprang to life with the Apple logo followed by a file folder with exclamation point icon. It's what I had expected as the CompactFlash drive had been formatted, but didn't have the iPod software installed yet. Much, much, much better than the Sad iPod icon. Best of all, no smoke leaked out. Connected it to the USB port on my computer, reinstalled the iPod software, including updating to the most current version and was rewarded with a full iPod Mini menu. Loaded some music, started the iPod playing, and exercised all the click wheel functions. Works just like a new iPod Mini! It's now headed back to its owner, who I hope will be tickled pink that her iPod has been resurrected from the dead, with twice its original drive capacity, and just a hair over 1.5x its original battery capacity. The iPod seems to be with its new lease on life.
Suggestion for this iPod's new name: Lazarus!

