Cat 5e / Cat 6 Ethernet Cable RJ45 Plug Repair
So you've got an Ethernet cable without (maybe with) an anti-snag protector over the locking tab and it finally broke off. This has happened to countless Ethernet cables. The RJ in RJ45 stands for Registered Jack (and RJ11 or RJ14 modular PSTN telephone plugs). It came about from an FCC mandate to standardize modular telephone jacks and their pinouts for wiring PSTN phone lines (good 'ol POTS line connections). Technically, an RJ11 may have six positions, but it only has two active wires - the center two. It's for single line PSTN phones. If someone has a two line phone and connection using four wires, it's technically an RJ14, which looks the same except it has four wires. The two middle ones are for line #1 and the pair on each side of them is for line #2. There's also the rarely used RJ25 which six wires for three lines, and yup, you guessed it, line #3 is the outermost pair.


The Fragile Locking Tab Breaks Too Easily . . .
I've digressed, but it gives some insight into the 8-wire RJ45 Ethernet cable plug and its origin. Whoever created the RJ design concept and its fragile locking tab should be soundly thrashed, publicly flogged, then tarred and feathered before being run out of town on a rail. I've seen countless telephone and Ethernet cables with broken tabs that cannot lock into the jack, just like this one. The arrow points to where the tab used to be. As is typical, it readily pulls out of an Ethernet jack and even if it doesn't pull out completely, the connection is very unreliable:
Repair or Replace . . .
That is the question. Most people pitch them, and then go to Best Buy, Staples, Office Max, or Target, depending on who is closest, and buy another as the broken one has created a connectivity crisis. Alas, these brick and mortar retail stores usually charge a king's ransom for decent Ethernet cables. They're much cheaper on Amazon, but then you have to wait a couple business days and pay shipping if you don't have Amazon Prime. Look first along the side of the cable. They're all marked with the internal wire gauge (AWG), how many volts can be pushed down the thin wires for PoE (Power over Ethernet) to power devices without using a wall wart (common for VoIP phones and remote cameras). Along with all that is the Category marking. Most encountered today will have Cat.5e marked on them, but there are many Cat.5 (no "e") still floating around, and the Cat. 6 are increasing in numbers. Cat.7 are currently rare (and expensive). The higher the category number, the greater the bandwidth (bits per second) you can push through the cable. If it's a Cat.5 (no "e"), pitch it and replace it with a Cat.6. The Cat.5 is obsolete. It was made for 10BaseT and 100BaseT Ethernet. It's only rated for 100 Megabit data throughput. If you find a Cat.4 cable, send it to the Smithsonian or some other museum with an ancient computer exhibit. Those with Cable provider Internet have a faster connection than a Cat.5 cable can deliver. Cat.5e was made for 1000BaseTX Gigabit bandwidth, ten times that. Cat.6 is the future and it's rated for 10 Gigabit with Cat.6a emerging now to handle a modest increase of that. If it's a Cat.5e cable under 25 feet that's otherwise in good condition, and used to connect a client device to a switch or router, you can keep it. Very few devices, including personal computers, demand more than 1 Gigabit throughput. VoIP phones require very little bandwidth. On the other hand, a shared media server on the home LAN should have Cat 6 to the router if multiple family members are accessing it simultaneously. It needs the bandwidth to handle multiple simultaneous demands for streaming content. Likewise, connections between routers and switches should be Cat. 6, as should the connection from the cable (or DSL) modem and the first router (the one with the WAN port, internal firewall, etc). The photo shows the markings on a five foot Cat.5e I just repaired.
Wire Gauge Considerations . . .
Almost pitched this one when I saw the wire gauge. It's 26 AWG which is mighty thin wire. Cat.5e for any appreciable distance should be at least 24 AWG, a thicker wire. The smaller the number, the larger the wire diameter. Historically, the wire gauge is the number of times it is "drawn" (pulled) in fabrication. The more times it's drawn, the thinner it becomes. Since the cable is only 5 feet long and isn't carrying any power for a device (PoE) of some kind (e.g. a camera or smart doorbell, etc.) it doesn't matter. I'll fix this one. If it were 25 feet or longer, or being used to carrying PoE to a device, I'd pitch it and replace it with a 24 or 23 AWG cable. For long distribution runs between switches and WiFi access points, 23 AWG works better with lower loss. For patch cables to go from a switch or router to another nearby switch or client device (e.g. computer, phone, TiVo, TV, etc.) 24 AWG is just fine. This is what typical wire gauge markings look like:

Required and Optional Tools and Materials
Required (bare minimum):
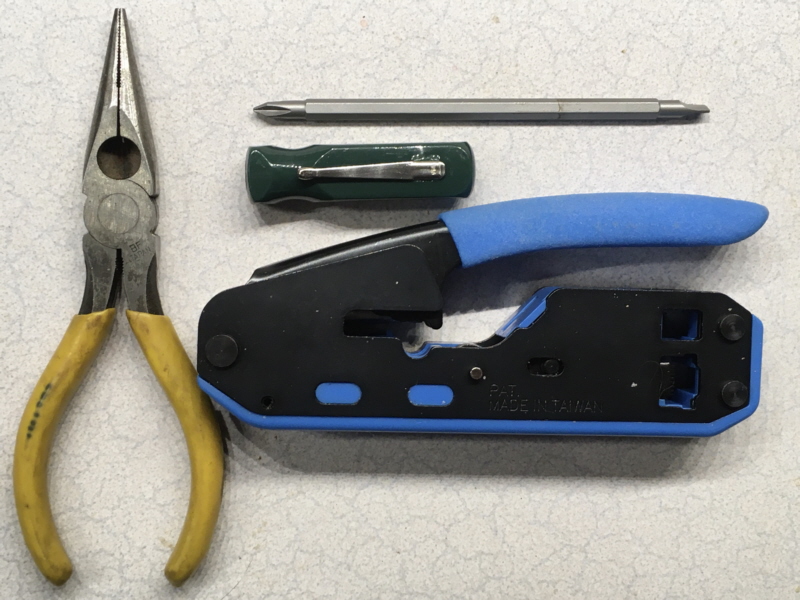


- Diagonal Cutters (aka Dikes), Needle-nose Pliers with cutter, Electrician's Pliers with a cutter, or a Cable Cutter (for cutting video cable) in excellent (sharp) condition. Don't use scissors for cutting wire! It ruins them by nicking their cutting (shearing) edges.
- Small #1 Phillips and flat tip screwdrivers (photo shows a reversible); almost made this optional, but it's very handy for a variety of tasks with consumer electronics.
- Connector Crimping Tool with built-in outer sheath stripper. The one in the photo is made by Ideal and it's an excellent value for the price at about $25 from Amazon. It's nearly identical to the Klein Tools crimper and much less expensive. I like this style which has plenty of crimping leverage without the long jaws and handles. Fits in a small tool bag or tool pouch pocket, and it's smaller than the cable tester. This one can also handle RJ11/RJ14 phone plugs. However, it's made for the blind plugs, not the pass-through (see below). Klein makes a simple RJ45 (only) crimper, the VDV226-005, that's about the same size and price, and trims the wire ends off a pass-through style plug.
- RJ45 plugs rated for Cat.5e and Cat.6 cables and data speeds. Two types of plugs. One is a blind termination with a solid plug end that requires cutting the wires to a proper length to fit to the plug end while having sufficient jacket for the crimping wedge to hold the entire cable in the plug. There's a narrow range of wire length of about 1/2" and all the wires must be very nearly the same length. Cutting the right length before insertion into the plug requires a bit of experience. The other kind in the bottle are "pass-through". With individual wires passing through the entire plug, they're easier for beginners to assemble and verify correct wire position visually. The wires can be cut at a slight angle letting the insertion get one wire placed properly at a time. The downside is having to trim off the excess wire flush to the plug end. Some crimping tools are made for these plugs and have a guillotine at the end of the plug that does this when it's crimped (e.g. the Klein mentioned above). Most diagonal wire cutters and cutters built into pliers cannot cut sufficiently flush with the end of the plug after crimping. The manual trimming method is pushing the cable hard into the plug, cutting as flush as possible manually before crimping, pulling back very slightly, and then crimping. Small diagonal cutters can get very close. Big ones don't work so well. A utility knife can also be used, very carefully to avoid trimming the end of your finger off with the wires. If too much protrudes, the plug won't seat fully into a jack. Unless you're dealing with 23 AWG cable, which is usually Cat.6 with solid copper wire for long distribution runs in overheads, plenums, and walls, the Cat.6 used for patch cables is typically 24 AWG stranded copper as the cable is subjected to being frequently flexed. I usually use 24 AWG Cat.5/Cat.6 rated plugs, but have used plugs made for 23 AWG without any problem. It's not quite as tight when the plastic wedge is crimped over the jacket though, increasing the importance of strain relief where the cable enters the plug. Plugs are dirt cheap from places like Amazon - typically 100 of them for about $5-$6 - and Amazon shipping (vs 3rd party seller) is free with Amazon Prime.
- RJ45 strain relief anti-snag hoods. These not only provide some strain relief on the cable as it enters the plastic plug, they also protect the locking tab, to prevent it from breaking off as easily. There are a couple styles of anti-snag strain relief. I prefer these but they add to the width and height of the plug. Another type is the same width and height with tabs that fit into the back of the plug plus another flexible tab that extends over the top of the locking tab. The type is a matter of preference. IMO the ones in the photo are better for anti-snag but a tight fitting plug can be a bit harder to get out of a jack, especially on a switch or router with closely spaced jacks. Unless there aren't any on hand for an emergency cable repair, a strain relief that protects the locking tab is a must. The strain relief anti-snag hoods are just as cheap as the plugs. Total parts cost is about $0.10 - $0.12 per RJ45 plug replacement (if you do it carefully and get it right the first time; check twice; crimp once).
Optional (makes life easier but adds cost):


- Magnifier, preferably on a table stand, or worn on the head that can be flipped up, but a hand-held works fine if that's what you have.
- Cable sheath cutter. The crimping tool should have one but these can be more convenient. Comes free in some packages of RJ45 plugs.
- Cable tester. These can be had from $10 to over $100. Don't buy the cheap Chinesium $10 tester. It will work once or twice and then inexplicably quit. I had a couple (past tense) and learned after the 2nd one went belly up after two or three uses. This one from Southwire was about $65 from Amazon. It's overkill for simple cable plug replacement although it's got a lot of bang for the buck compared to others. Southwire has a basic model, the M550, for about $31 on Amazon that will verify you got it right, or tell you what the fault is, and it's an excellent value. Like this one it can also test video cable. Doesn't have an RJ11/RJ14 jack but can be pressed into service with phone cables if you know what you're doing (a phone cable is typically very easy to inspect).
- Swiss Army Knife "Super Tinker" (by Victorinox). Has a big blade, little blade, can opener, bottle opener, and most important, a #2 Phillips screwdriver, and scissors. The Phillips is much more useful for cable repair than a corkscrew. The scissors come in handy snipping a little more insulation jacket, cutting a center divider (most Cat.6 has it), and the string sometimes found inside the cable. (Not for cutting wire - that's what the wire cutters are for.) A Deluxe Tinker adds a small pair of slip-joint pliers, but small needle-nose are more useful.
Preparing the Cable . . .
- Cut the old RJ45 off using the cable or wire cutters and pitch the broken connector into the rubbish bin.

- Put the strain relief onto the cable end in the correct orientation. I've forgotten to do this and had to start over. Embarrassing. I do it right after lopping off the broken RJ45 now.

- Strip about 2 inches of cable jacket off of the cable, exposing the eight wires in four twisted pairs. Here I'm using the stripper built into the crimping tool.

- Spread the pairs apart. There will be an orange pair, a blue pair, a brown pair and a green pair I arrange them with the orange on the left, the blue away from me in the middle, the brown on the right, and the green toward me opposite the blue. Makes it easier for me to arrange the wires in order in the next part.


Untwisting the Pairs and Arranging Wires in Proper Sequence
- May seem counter-intuitive, but the locking tab is on the bottom of the connector. The contacts are on the top of the connector. As the end of the top is facing away from you, the pins are numbered 1-8 from left to right. The sequence of them isn't arbitrary, it's based on best crosstalk reduction and resilience to electrical interference from other nearby devices for maximum Cat.5e data throughput, which carries over into Cat.6 and Cat.7. There are two standards for the wiring sequence, T-568A and T-568B. If you look at the top (tab side down) of an Ethernet RJ45 you'll very nearly always see the T-568B color sequence. The difference between T-568A and B are the swapping of the orange and green wires. From a data throughput standpoint they have the same performance. The "A" has history in legacy USOC telephone wiring with the blue and orange being used for Line #1 and Line #2 respectively. It continues to be specified and required in some government contract work, but the rest of the world uses T-568B. It doesn't matter technically if both ends of a cable are one or the other, as long as they're both the same, but it's considered very bad practice to mix T-568A and T-568B cables in the same installation and system. Someone coming along later may very well see one and do a repair on a different cable assuming the entire installation used that standard when it didn't, ending up with a cross-wired cable. The average patch cable repair DIY'er should just use T-568B as it's likely all you will ever see in your lifetime. The last time I saw the T-568A color sequence was dealing with a PSTN telephone system decades ago, and it had nothing to do with Ethernet and digital data transmission. Everything Ethernet beyond four wire Cat.3 has all been T-568B. Unlike modular two-wire and four-wire telephone cables, both ends of a standard Ethernet cable should be wired the same. A "crossover" cable is a different animal with very special and unusual application. All current equipment will detect whether or not it should have a crossover and configure itself accordingly. Been that way for quite a few years now - to avoid the need for identifying those rare occasions requiring one. I've seen old documentation from the Cat.4 and Cat.5 era stating T-568A on one end and T-568B on the other end creates a cross-over cable. Not so in the current Cat.6 and Cat.7 era that can use all eight lines for full duplex Gigabit. Don't do it and you'll stay out of trouble. Make both ends T-568B.

- The wires should be untwisted and laid out from left to right as they will be inserted into the plug. This is why I had the green closest and blue farthest. It allows placing the green stripe and solid green around the blue pair. They alternate striped and solid, even though the green pair is split up around others. Get the wires as straight as possible. If using a pass-through style plug, you won't need to trim them down.

- In this repair I used a blind end plug and needed to trim them down after getting them in the proper sequence working them around to get them aligned with each other. I cut them with the diagonal cutters (not the scissors) while holding them firmly, and then continued to work and flex them some to get them more relaxed in the proper order.


Plug Assembly and Crimping
- Assembly into the plug which, should be done with the locking tab facing down can require some finagling to get the proper colored wires into the correct holes. The wires in some cables seem to have a mind of their own. There is a learning curve to doing this and it slowly gets easier with experience, especially with blind end plugs and the variants that have staggered wire holes. It's gotten much easier for me. The DIY'er who doesn't do them very often would probably find the pass-through easier to work with. For the non-staggered (vertically), I've found keeping the wires toward the top tends to guide them easier. For the plugs with vertically staggered holes (half slightly higher than the others) it can take a bit of wiggling. Don't force it, you'll just bend the wires and have to pull it apart and straighten them out.

- This is the time to do an inspection to ensure all the colors are in the proper holes. Use a magnifier if necessary, looking at not just the top, but the bottom as well even though it's more difficult through the tab. Take care that the plug doesn't slide off (been there, done that). Some striped wires are very sparsely striped. If one is out of order, pull it apart, reposition the wires in the proper sequence and go at it again. Patience is important and it gets quicker with experience. The pass-through is very easy to inspect and verify. Look twice; crimp once. Avoids wasting a plug and having to start all over from the beginning.

- Once you've verified they're all in the correct holes, the connector can be crimped using the crimping tool. A decent tool doesn't need to be expensive, but avoid the cheap $5 Chinesium crimper. They're sloppy and frustrating to work with. This Ideal is nearly identical to the Klein and was barely over $20 from Amazon. I was impressed when I unwrapped it and used it the first few times. Doesn't need that much force. You can tell when you've bottomed out from the feel of the tool. No point in cranking down with yet more force. It's not going to do anything except make your hand red.


Inspection, Strain Relief Assembly, and Test
- If you did the inspection right before crimping, this should be perfunctory, but it's worth a look anyway. Bad news never improves with age. If it's not wired correctly, it's not going to work when installed. May as well know it now. In addition to verifying color sequence again, I also look at the wedge that holds the cable in the connector, and contact penetration through the wires. Here, the three spear-point tips of the contact can be seen protruding from the bottom of the brown wire.
 More spear-point tips can be seen looking at the wires through the plug bottom. A magnifier can help, but even with that, looking through the locking tab at the center wires isn't very easy.


- Slide the strain relief over the rear of the plug and over the top of the locking tab. Shouldn't require much force. Some cables are larger in diameter than others which might require a bit of wiggling to move one that's a bit tight on the cable. You should know from feel and how far the locking tab is in or under the anti-snag hood when it's all the way on.

- If you have a tester, the final step is testing it. If everything was done properly, this should be a perfunctory verification, but if there was a mistake, Bad News never improves with age. Better to know now than later after installing the cable. It also verifies the insulation displacement tines on the contacts have done their job properly. This cable passed (difficult to read in the photo), with one end in the top of the tester and the other in the remote receiver. All of yours should also pass.


One final tip . . .
Electrical cords should never be folded up flat and squished. It's very hard on the wires, and causes more resistance with the electrons having to go around hairpin turns (no joke, this is real). It's hardest on cables like these that have very fine wires in them, and it's a leading cause of cable failure other than the plugs. Excess cable should be coiled. I use thin strips of Velcro to hold the small coil. Likewise, stored cables should always be coiled up, without twisting them. I hate it when I unpack a new electronic device and see the thin power cable from the wall wart to the device folded up and smashed flat. Very bad practice, but seemingly commonplace. I always untie them and loop them into an untwisted coil, attempting to get rid of as much folded up memory as possible.
John